
Pasta Bridges
Build Pasta Bridges
Building a bridge that can withstand the elements requires some creative thinking, careful planning, and testing. Design and build the strongest bridge you can with uncooked pasta.
What you need:
Two pie plates turned upside down. These will act as the gap your bridge will try to cross. Any two items of the same height will also work
Uncooked spaghetti - as much as you need (depends upon how long you want your bridge to be!)
Plasticine or modelling clay
Hot glue gun (Have an adult help you with this!)
Elastic bands
Ruler
Tape
Weights or toy cars to test the strength of your bridge
Several pieces of paper
Something to write with
What you do:
A bridge is a structure that crosses over an open area, such as a river or mountain valley. Before we build our pasta bridge, let’s test some basic ideas.
Place your items that are the same height on a flat surface and measure the distance between them. A suggested distance is about 30 cm. If you are using pie plates, be sure to place them on the surface so the bottom is facing up.
Cut a strip of paper about 7 cm across, and a bit longer than the distance you measured between your two items.
Place the strip of paper on top of the two items. Place your toy car on the paper to test to see if your simple paper bridge can hold the weight of the toy. What happens? Most likely, your strip of paper was not strong enough to hold the weight of the toy car and your toy car fell. What can we do to make this bridge stronger?
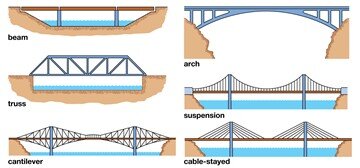
Engineers create strong bridges by combining different types of structures together such as beams, arches, trusses and suspensions. In the explanation section below, there are some examples of each type of these structures. We are going to test three of these structure types in paper first before we get to work building our pasta bridge.
Using some paper and a pen or pencil make a simple chart like the one below:
| Bridge Structure | What Happened? |
| --------------------- | --------------------- |
| Beam | |
| Arch | |
| Truss | |
| Combination |
For beams, try making a paper tube the same height as your pie plates and place it the middle of the distance between the pie plates. Now, place that strip of paper we did the first test with on top of the beams. Test your beam bridge with your toy car. What happens? Record what happens in the chart you made. What happens if you use two beams, or three? Test and record your results in the chart.
To test an arch, take another strip of paper about the same size as the first one and try to curve it into a half circle. You could also use a paper cup on its side. Place your paper arch between the pie plates, and your first strip of paper on top of your arch. What happens? Record what happens in the chart you made. What if you used multiple smaller arches? Test and record your results in the chart.
To test trusses, take another piece of paper and fold down the top about 3 cm down. Turn the paper over and fold down again another 3cm. Repeat folding back and forth until you have folded your way to the end of the paper. You should have something that looks like this:
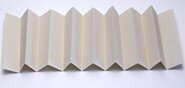
Put your folded piece of paper in between the pie plates, and your test strip of paper on top of the folded paper. What happens? Record your results in your chart.
Now try some combinations of these structures. Test an arch with trusses, or an arch of beams. Keep testing your car on each combination you come up with and record your results in the chart.
Now that we know a little about what makes a bridge strong, let’s design our pasta bridge. Draw out your design on a piece of paper. Don’t forget to include what we have learned so far about the different types of structures engineers use in their bridge designs.
Build your pasta bridge design. You can use a hot glue gun if there is an adult around to help you, or you can use elastic bands, tape, or modelling clay to construct your pasta bridge.
Once complete, don’t forget to test the strength of your bridge and record your results. How can you change your design to make your bridge even stronger?
Explanation:
Bridges have been built for thousands of years using a range of different materials such as rocks, mud, lumber, metal, concrete, and even glass. The strength of a bridge is determined by its structure, not the materials it is made of.
Engineers create strong bridges by combining different types of structures together such as beams, arches, trusses and suspensions.
Here are some examples of different structures engineers use when designing their bridges:
BEAMS
Beam bridges use pillars dug deep into the ground or foundation to support the weight of the bridge on top of the pillars.
ARCHES
Arch bridges use an arch underneath the pathway to support the weight of the bridge, and also allows people and vehicles to pass under the bridge.

TRUSSES
Truss bridges use multiple triangles and walls to give a bridge strength.

SUSPENSIONS
Suspension bridges use cables between the deck of the bridge and towers along the bridge to help hold the weight of the bridge.

An engineer is a person who designs and builds complex products, machines, systems, or structures. Engineers want to know how and why things work. They have scientific training that they use to make practical things. (National Geographic).
Structural engineers must consider many factors when designing a structure such as what is the purpose of the structure, where is it going to be, what kind of ground will it be built on, what kind of weather will it be faced with, what materials will be best to use and many other considerations.
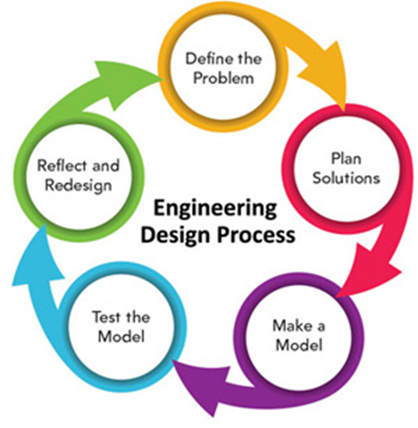
Throughout this challenge, you participated in a similar engineering design process.
Important terms:
Buckling: When a material bends under compression.
Compression: When a force pushes materials together.
Elasticity: The property of a material to bend or deflect, and then return to its original shape.
Force: Any influence that tends to accelerate an object; a push or a pull.
Load: The weight which a building or structure must carry.
Dead Load: The weight of the building itself plus all permanent fixtures; does not change.
Live Load: Weight of the objects which move in, out, or shift in the building (people, furniture, etc.); constantly changing.
Plasticity: The property of a material in which it does not return to its original form after a bend or deflection.
Shear: When a force slides material against one another.
Tension: When a force pulls materials apart.
Taking it further:
Try building a bridge out of paper and tape and see if your bridge can hold the weight of 100 pennies.
Try testing how suspension structures work.
Take a walk around your neighbourhood and see if you find any bridges. Draw the different structures that you see that make the bridge strong.
How much weight can your bridge hold?
What is the longest bridge you could build?
Can your bridge survive a windstorm or an earthquake? How could you test that?
Try building a cantilever bridge as shown below.
Loving this content? Make a donation to the Saskatchewan Science Centre!
#letssciencethis #SaskScienceCentre #AtHomeWithCASC #ScienceChampions #ScienceAtHome #realsciencerealfun